Machinery
The machinery is the engine of the Kerberos Open Source agent, it connects to the camera and makes recordings.
Kerberos Open Source is deprecated, please use Kerberos Agent instead.
The machinery is the processing engine of Kerberos Open Source. It’s an image processing framework, written in C++, who benefits from other third party libraries (OpenCV, etc). It takes images from the type of camera (USB-, IP- or RPi-camera) you’ve configured in the configuration files and executes one ore more algorithms and post-processes (e.g. save a snapshot). The configuration files allow you to define the type of camera, post-processes, conditions and much more; it’s highly configurable. It’s important to note that the machinery, out-of-the-box, can handle only one camera at a time.
Project structure
The machinery is an image processing framework which is devided into four steps:
- condition
- algorithm
- expositor
- heuristic
The steps belong to a four passway; illustrated on the image below. In each cycle a sequence of images is processed. Each step will process the sequence, and will return some result to the next step. For example: an algorithm will process the images and returns an array to the Expositor, which contains boolean values. The steps are loosly coupled, so they have simple conventions, just like the example before.
Thanks to the loosly coupling, each step can be developed indepently. So algorithms, expositors, heuristics and conditions can be switched on the fly. This makes it easier for other developers who want to contribute to the machinery. They can create a new algorithm without knowing how a specific expositor or heuristic works. They just need to be aware of the convention an algorithm should meet.

The Kerberos Opensource agent is composed out of different concepts.
These different steps can be configured by editing a couple of configurationn files located at config/. The main configuration file config/config.xml looks like this:
<?xml version="1.0"?>
<kerberos>
  <instance>
    <name type="text">frontdoor</name>
    <logging type="bool">false</logging>
    <timezone type="timezone">Europe-Brussels</timezone>
    <capture file="capture.xml">RaspiCamera</capture>
    <stream file="stream.xml">Mjpg</stream>
    <condition file="condition.xml" type="multiple">Enabled</condition>
    <algorithm file="algorithm.xml">DifferentialCollins</algorithm>
    <expositor file="expositor.xml">Hull</expositor>
    <heuristic file="heuristic.xml">Sequence</heuristic>
    <io file="io.xml" type="multiple">Video</io>
    <cloud file="cloud.xml">S3</cloud>
  </instance>
</kerberos>
Capture
You can choose which capture device you will be using, you can use your old USB webcam, the popular Raspberry Pi camera or a state-of-the-art IP camera. The capture device will take pictures and deliver them to the algorithm if the conditions (the first step of the four passway) are valid.
You can change the capture device by changing the config/config.xml file, and choose one of the following:
- USBCamera
- RaspiCamera
- IPCamera
<?xml version="1.0"?>
<kerberos>
  <instance>
    ...
    <capture file="capture.xml">RaspiCamera</capture>
    ...
  </instance>
</kerberos>
USB camera
The machinery supports a whole range of USB cameras. You will find a complete list here. Make sure you have updated the web interface, to make the machinery aware you will be using an USB camera.
Parameters
The parameters of the USB camera can be found in the config/capture.xml file, but you can also use the web to modify the parameters. Below you see a default configuration file.
<captures>
  <USBCamera>
    <frameWidth type="number">1280</frameWidth>
    <frameHeight type="number">720</frameHeight>
    <deviceNumber type="number">0</deviceNumber>
    <delay type="number">0</delay>
    <angle type="number">0</angle>
  </USBCamera>
</captures>
Framewidth and -height
You can set the resolution of the capture device, make sure the resolution you’ve defined is valid with your camera. Please check the specs of the USB camera you’re using.
Device number
If more than one device is connected, you can specify the index of the USB-camera. The index is an integer (1-5).
Delay
You can provide a delay/interval (milliseconds) between two captures.
Angle
By defining an angle (degrees), you can rotate the images taken by the capture device. For example if you would mount the camera upside down, than you could enter the value 180 as the angle; this will flip the images.
Raspberry Pi Camera Module
You can use the Raspberry Pi Camera Module with the machinery. You just need to attach the camera module and you’re ready to go. The Raspberry Pi Camera Module is enabled by default in the web.
Parameters
The parameters of the Raspberry Pi Camera Module can be found in the config/capture.xml file, but you can also use the web to modify the parameters. Below you see a default configuration file.
<captures>
  <RaspiCamera>
    <frameWidth type="number">640</frameWidth>
    <frameHeight type="number">480</frameHeight>
    <delay type="number">1400</delay>
    <angle type="number">0</angle>
    <framerate type="number">30</framerate>
    <sharpness type="number">0</sharpness>
    <saturation type="number">0</saturation>
    <contrast type="number">0</contrast>
    <brightness type="number">50</brightness>
  </RaspiCamera>
</captures>
Framewidth and -height
You can set the resolution of the camera module, make sure the resolution you’ve defined is valid.
Delay
You can provide a delay/interval (milliseconds) between two captures.
Angle
By defining an angle (degrees), you can rotate the images taken by the capture device. For example if you would mount the camera upside down, than you could enter the value 180 as the angle; this will flip the images.
Framerate
The number of frames captures per second. Please note that this parameter will also be used if you’re recording video. E.g. if you set this parameter to 20, you’re recorded videos will also be 20 FPS.
Sharpness, saturation, contrast, brightness
Camera properties which you can specify to tune the settings to your needs.
IP camera
The machinery can be used with any IP camera, that provides a RTSP (or MJPEG) stream. Make sure that you know the correct URL of your IP camera, you can find a list here.
Parameters
The parameters of the IP capture device can be found in the config/capture.xml file, but you can also use the web to modify the parameters. Below you see a default configuration file.
<captures>
  <IPCamera>
    <url type="text">http://username:password@ipaddress/image.jpg</url>
    <frameWidth type="number">800</frameWidth>
    <frameHeight type="number">640</frameHeight>
    <delay type="number">0</delay>
    <angle type="number">0</angle>
  </IPCamera>
</captures>
URL
To use your IP camera, you should provide a valid RTSP (or MJPEG) URL. The machinery will take snapshots from this stream.
Framewidth and -height
You can set the resolution of the capture device, make sure the resolution you’ve defined is equal to the resolution you’ve defined in your IP-camera software.
Delay
You can provide a delay/interval (milliseconds) between two captures.
Angle
By defining an angle (degrees), you can rotate the images taken by the capture device. For example if you would mount the camera upside down, than you could enter the value 180 as the angle; this will flip the images.
Condition
The condition is the first step of the four passway. In this step the machinery will determine if it’s allowed to proceed to the next step. For example a condition can be a time constraint, a brightness threshold, etc; multiple conditions can be selected.
<?xml version="1.0"?>
<kerberos>
  <instance>
    ...
    <condition file="condition.xml" type="multiple">Enabled</condition>
    ...
  </instance>
</kerberos>
Enabled
It can be helpful to enable or disable the machinery at specific times. Therefore the time condition makes it possible to select a time range for each day of the week. When the current time is within the time range, the machinery will be enabled.
Parameters
The parameters of the Enabled condition can be found in the config/condition.xml file, but you can also use the web to modify the parameters. Below you see a default configuration file.
<conditions>
  <Enabled>
    <active type="bool">true</active>
    <delay type="number">5000</delay>
  </Enabled>
</conditions>
Active
The active field is boolean value (true/false). When the active field is true, the machinery is enabled, if not it’s disabled.
Delay
The delay value is used when the condition failed, so when the current time isn’t in the selected time range for that day. In that case the machinery will idle for the specified delay time. The value of the delay is expressed in miliseconds.
Time
It can be helpful to enable or disable the machinery at specific times. Therefore the time condition makes it possible to select a time range for each day of the week. When the current time is within the time range, the machinery will be enabled.
Parameters
The parameters of the Time condition can be found in the config/condition.xml file, but you can also use the web to modify the parameters. Below you see a default configuration file.
<conditions>
  <Time>
    <times type="timeselection">13:00,15:00-0:01,20:58-0:01,20:59-0:01,19:20-0:01,21:59-0,0-0,0</times>
    <delay type="number">10000</delay>
  </Time>
</conditions>
Times
The times property contains a list of times, delimited by a “-”. The first item in the list will specify the time range for the first day of the week (Monday), the last item for the last day of the week (Sunday). The begin- and end-time, for a specific day, are delimited by a “,” where the first element will specify that start time and the second one specifies the end time.
Delay
The delay value is used when the condition failed, so when the current time isn’t in the selected time range for that day. In that case the machinery will idle for the specified delay time. The value of the delay is expressed in miliseconds.
Algorithm
The algorithm is the second step of the four passway. An algorithm will execute some kind of function on a sequence of images, and end up with a black and white image; just like the image below. An example of an algorithm would be one that does motion detection or one that would detect cats or dogs (using TensorFlow, ar any other Deep Learning framework).

An algorithm allows us to find the pixels of interests.
The white pixels on the image will indicate the object of interest. For example, when looking for motion, the pixels that have been changed; it depends on what the algorithm is looking for. The black pixels are background pixels.
The only convention that an algorithm should meet is that it should return a black and white image to the next step; the expositor. And of course that it requires a sequence of images as a parameter. Besides those conventions, an algorithm can do everything it wants to do. So you could create your own cat detection algorithm, marker detection, etc.
You can select the algortihm in the config/config.xml.
<?xml version="1.0"?>
<kerberos>
  <instance>
    ...
    <algorithm file="algorithm.xml">DifferentialCollins</algorithm>
    ...
  </instance>
</kerberos>
Differential images
This algorithm is a very simple method to detect motion; in terms of understanding but also processing. Just like the name says, it’s the result of comparing images. When the images are compared, we know the pixels that have been changed and if the amount of pixels that changed is big enough, one can say that something happened and thus motion was detected.
To get a more technical explanation: the algoritm will substract 2 or more images, and once that is done it will end up with a black and white image. The white pixels will mark the pixels that where different/changed and the black pixels are the pixels that have not changed; background pixels. Please note that there are several different combinations of substracting images. However for the machinery, we will use the method of Collins et al. as this method erases the phenomenon “ghosting”.
The differential images algorithm takes a sequence of images to calculate motion.
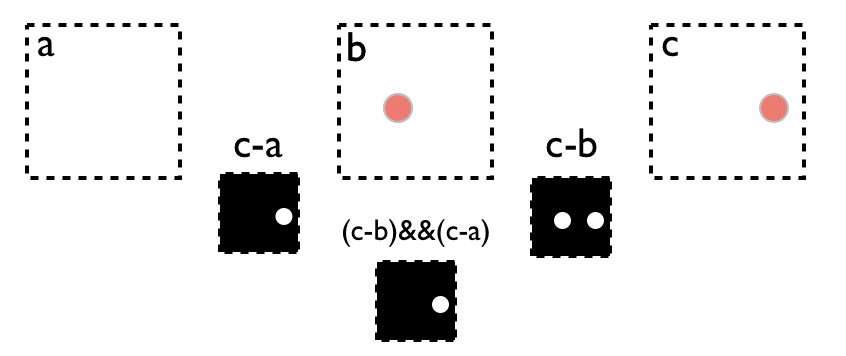
In the image above the method of Collins et al. is illustrated. For this method we will process three images. The images are a sequence (from left to right), so the first (A) image was taken before the second (B) one, and the second (B) before the third (C) one. Next we will do a first comparision (C-B) of the third (C) image and the second (B) image, and after that we will do a second comparison (C-A) of the third (C) image and first (A) image.
After the comparison we will end up with two difference images (C-B) and (C-A); both will mark the white pixels as changed pixels and black as non-changed pixels. To finish the algorithm we will do a logical AND-operation of the two difference images; this will give us the final black and white image ((C-B)&&(C-A)).
The main idea of the Colins et al. method, is that it will erase “ghosting”. In the last step we are doing a logical AND-operation, by doing this we will only keep the pixels, that changed in the first two images; therefore we can eliminate false positives.
Parameters
The parameters of the Differential images algorithm can be found in the config/algorithm.xml file, but you can also use the web to modify the parameters. Below you see a default configuration file.
<algorithms>
  <DifferentialCollins>
    <erode type="number">5</erode>
    <threshold type="number">20</threshold>
  </DifferentialCollins>
</algorithms>
Erode
The erode parameter represents a structural element (a morphological operation), which will be used to minimize the changed pixels; more information about eroding can be found here. The idea of the eroding is that pixels which are isolated will be removed; this means that when only one pixel changed, that pixel will reverted to the non-changed state. But for example when a large change happens and a lot of adjacent pixels are changed, the eroding will not be able to revert them.
The higher the number of the erode parameter, the more aggressive the eroding will be. So high erode values, will make it possible that also large changes will be reverted to the non-changed state.
Threshold
When doing the comparison of two images, we won’t end up with a clean black and white image. In most of the cases the values will be between 0 and 255; so gray values. This means that the value 0 will mean that both pixels where the same in both image, and values 255 mean that both pixels where totally different in both images. Of course we will also have values between 0-255, so pixels that are a little bit different in both images. So to make the resulting black and white image, we will need to apply a threshold value.
The threshold will specify how much a pixel has to be different in the two images. So for example when the threshold is 30, it means that the difference between two pixels has to be equal or more then 30. The higher the threshold the more the pixel needs to be different, to be marked as changed.
Expositor
After the algorithm is executed, the expositor will determine, a region, where the changes were detected. An expositor can constrain a region in terms of selecting a hull or defining a rectangle.
An expositor receives a black and white image as parameter and should modify a JSON object with all the information it processed. The JSON object must include: the bounding rectangle(s) of the positions where the pixels of interest are located and the number of pixels of interest. But can also include other optional parameters.
You can change the expositor by changing the config/config.xml file, and choose one of the following:
- Hull
- Rectangle
<?xml version="1.0"?>
<kerberos>
  <instance>
    ...
    <expositor file="expositor.xml">Hull</expositor>
    ...
  </instance>
</kerberos>
Rectangle
This is a trivial expositor. A rectangle region can be defined to constrain the locations of pixels of interest. The rectangle repositor will return the region of the pixels of interest.
Parameters
The parameters of the rectangle expositor can be found in the config/expositor.xml file, but you can also use the web to modify the parameters. Below you see a default configuration file.
<expositors>
  <Rectangle>
    <region>
      <x1 type="number">0</x1>
      <y1 type="number">0</y1>
      <x2 type="number">1280</x2>
      <y2 type="number">720</y2>
    </region>
  </Rectangle>
</expositors>
Region
The region parameter contains 4 values; x1, y1, x2 and y2 respectively. The values x1 and y1 indicate the x- and y-coordinate of the left upper starting point. The values x2 and y2 are the bottom right coordinates. A virtual rectangle will be drawn from (x1,y1) to (x2,y2). Pixels of interest that lie within this rectangle are valid pixels; if not they are invalid.
Hull
This hull is a more complex expositor than the rectangle. A hull can be selected with the web, you can select one or more coordinates to create a flexible region. The coordinates can be adjusted afterwards and be removed by double clicking on the coordinate. You can expand the hull by removing the start coordinate, which is marked by the white bullet.
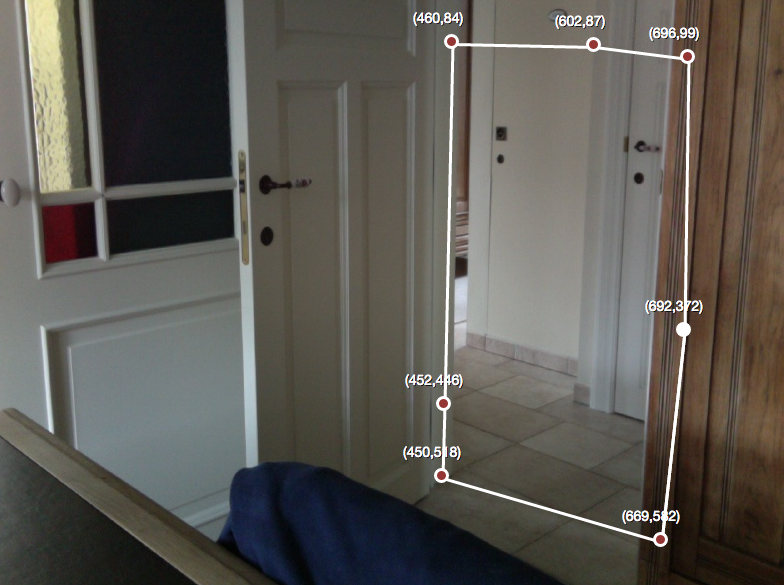
A hull, or polygon, allows you to specify a region of interest.
Parameters
The parameters of the hull expositor can be found in the config/expositor.xml file, but you can also use the web to modify the parameters. Below you see a default configuration file.
<expositors>
  <Hull>
    <region type="hullselection">347,361|627,266|975,328|1091,328|1148,413|1158,516|1121,534|962,567|699,648|531,700|243,613|423,550|665,453|850,470|666,361|467,385|325,460|165,372</region>
  </Hull>
</expositors>
Region
The region parameter contains n values. Each value represents a coordinate (x,y) and are seperated by the “|” delimiter. These coordinates are used to calculate the concave hull. Pixels of interest that lie within the concave hull are valid pixels; if not they are invalid.
Heuristic
The heuristic is the last step in the four passway which will decide if the detection is valid or not. It will do this by using information from the previous steps (the expositor and the algorithm); e.g. number of changed pixels.
You can change the heuristic by changing the config/config.xml file, and choose one of the following:
- Sequence
<?xml version="1.0"?>
<kerberos>
  <instance>
    ...
    <heuristic file="heuristic.xml">Sequence</heuristic>
    ...
  </instance>
</kerberos>
Sequence
This is a trivial heuristic. The sequence heuristic will store a single integer in memory, that will count the numbers of valid detections. When the heuristic will detect a false detection, it will decrease the count. The sequence heuristic will return true, if a threshold is reached; for example when something was detected three times in a row.
Parameters
The parameters of the Sequence heuristic can be found in the config/heuristic.xml file, but you can also use the web to modify the parameters. Below you see a default configuration file.
<heuristics>
<Sequence>
    <minimumChanges type="number">1</minimumChanges>
    <minimumDuration type="number">1</minimumDuration>
    <noMotionDelayTime type="number">2000</noMotionDelayTime>
  </Sequence>
</heuristics>
Minimum changes
The heuristic will only return true if enough changes have been detected. The minimum of changes indicates the minimum number of pixels that have to been changed, to be a valid detection.
Minimum durations
The minimum number of detections in a row to be a valid detection.
No motion delay time
When the heuristic failed, due to not enough pixels changed or not x detections in a row, the heuristic will idle for some time.
Output
If the heuristic determined that the evaluation was valid, one or more output operations can be executed. You configure which ooutput operations that will be executed, by modifying the configuration file or using the web interface.
<?xml version="1.0"?>
<kerberos>
  <instance>
    ...
    <io file="io.xml" type="multiple">Video</io>
    ...
  </instance>
</kerberos>
You can choose which output devices you will be using. If you select multiple outputs, seperate them with an ,. You can change the output device by changing the config/config.xml file, and choose one of the following:
- Disk
- Video
- GPIO
- TCPSocket
- Webhook
- MQTT
- Script
Disk
An image can be saved to disk.
Parameters
The parameters of the Disk output device can be found in the config/io.xml file, but you can also use the web to modify the parameters. Below you see a default configuration file.
<ios>
  <Disk>
    <fileFormat type="text">timestamp_microseconds_instanceName_regionCoordinates_numberOfChanges_token.jpg</fileFormat>
    <directory type="text">/etc/opt/kerberosio/capture/</directory>
    <markWithTimestamp type="bool">false</markWithTimestamp>
    <timestampColor type="text">white</timestampColor>
    <privacy type="bool">false</privacy>
    <throttler type="number">0</throttler>
  </Disk>
</ios>
File format
The format that will be used for the name of the image. One or more variables can be defined and will be replaced by the machinery. Note that when you’re using a variables name in the file format, that this name should be defined in the JSON object.
Directory
The directory where the image will be saved to. By default images are saved to the /etc/opt/kerberosio/capture directory.
Mark with timestamp
When this settings is set to true, the image is marked with a timestamp.
Timestamp color
A color can be defined for timestamp: white, black, red, green and blue.
Privacy
The privacy mode can be activated to remove some parts from the image. This especially helpful if you want to filter out public areas. When this option is enabled you will seee that after configuring the Hull expositor, you’ll see that the pixels outside your region of interest (Hull) are made black.
Throttler
Control the number of executions by setting a throttling value. E.g. if you set throttling to 5, the Disk will only be triggered once in 5 seconds, nevertheless more detections occurred.
Video
When a valid event is detected, a video will be recorded for x seconds. When more valid events are detected, while a video is recording, the video file will further record for x seconds; so no new video file be recorded, but the existing one will be expanded.
Parameters
The parameters of the Video output device can be found in the config/io.xml file, but you can also use the web to modify the parameters. Below you see a default configuration file.
<ios>
  <Video>
    <fps type="number">3</fps>
    <recordAfter type="number">5</recordAfter>
    <maxDuration type="number">120</maxDuration>
    <extension type="number">mp4</extension>
    <codec type="number">h264</codec>
    <fileFormat type="text">timestamp_microseconds_instanceName_regionCoordinates_numberOfChanges_token</fileFormat>
    <directory type="text">/etc/opt/kerberosio/capture/</directory>
    <hardwareDirectory type="text">/etc/opt/kerberosio/h264/</hardwareDirectory>
    <enableHardwareEncoding type="bool">true</enableHardwareEncoding>
    <markWithTimestamp type="bool">false</markWithTimestamp>
    <timestampColor type="text">white</timestampColor>
    <privacy type="bool">false</privacy>
    <throttler type="number">0</throttler>
  </Video>
</ios>
FPS
The frames per second of the video being recorded. Please note that this number is limited and depends heavily on your hardware setup. You’ll be receiving following warning in the systems logs, if the machinery can’t write the desired FPS.
[trivial] IoVideo: framerate is too fast, can't record video at this speed (8/FPS)
Record after
The number of seconds recorded after the last valid event was detected. This means that when a video is already recording, and a valid event was detected, the video will be expanded with x more seconds.
Extensions
The extension or container of the video file. We highly recommend to use the MP4 container if you want cross-browser support. Leave this setting by default, if you don’t know what you’re doing.
Codec
The codec that is used to encode the video file.
File format
The format that will be used for the name of the image. One or more variables can be defined and will be replaced by the machinery. Note that when you’re using a variables name in the file format, that this name should be defined in the JSON object.
Directory
The directory where the videos will be saved. By default videos are saved to the /etc/opt/kerberosio/capture directory.
Hardware directory
When using onboard hardware encoding (e.g. with Raspberry Pi camera), h264 video files are generated and stored in this directory. Afterwards these h264 files will be containerized to mp4 files, and stored in the Directory path.
Enable Hardware encoding
A boolean which can enable or disable hardware encoding. Please note that this option is enabled by default, but does not mean that it will work if you choose to use an USB camera.
Mark with timestamp
When this settings is set to true, the video is marked with a timestamp (similar to the Disk device).
Timestamp color
A color can be defined for timestamp: white, black, red, green and blue.
Privacy
The privacy mode can be activated to remove some parts from the video. This especially helpful if you want to filter out public areas.
Video privacy
After updating the configuration, you’ll see that the pixels outside your region of interest (ROI) are made black; the image below illustrates this.
Throttler
Control the number of executions by setting a throttling value. E.g. if you set throttling to 5, the Video will only be triggered once in 5 seconds, nevertheless more detections occurred.
TCP/IP client
The TCP/IP client will send a TCP packet to a server.
Parameters
The parameters of the TCP/IP client can be found in the config/io.xml file, but you can also use the web to modify the parameters. Below you see a default configuration file.
<ios>
  <TCPSocket>
    <server type="number">127.0.0.1</server>
    <port type="number">1337</port>
    <message type="text">it's so fluffy</message>
    <throttler type="number">0</throttler>
  </TCPSocket>
</ios>
Server
The IP of the TCP server.
Port
This is the port of the TCP server.
Message
You can send some data to a TCP server.
Throttler
Control the number of executions by setting a throttling value. E.g. if you set throttling to 5, the TCP will only be triggered once in 5 seconds, nevertheless more detections occurred.
GPIO
A GPIO pin can be set as output device.
Parameters
The parameters of the GPIO pin can be found in the config/io.xml file, but you can also use the web to modify the parameters. Below you see a default configuration file.
<ios>
  <GPIO>
    <pin type="number">17</pin>
    <periods type="number">5</periods>
    <periodTime type="number">100000</periodTime>
    <throttler type="number">0</throttler>
  </GPIO>
</ios>
Pin
The pin that will be triggered.
Periods
The number of times the pin will be triggered.
Period time
The time in microseconds that the pin will be set high.
Throttler
Control the number of executions by setting a throttling value. E.g. if you set throttling to 5, the GPIO will only be triggered once in 5 seconds, nevertheless more detections occurred.
Webhook
Detailed information (a JSON object) is send as a POST request to a webhook. The JSON object contains the number of changes, the region, the URL of the image, etc. This is useful if you want to integrate with your own application.
Make sure that the Webhook comes after the Disk device, otherwise the URL of the image is not included.
Parameters
The parameters of the webhook can be found in the config/io.xml file, but you can also use the web to modify the parameters. Below you see a default configuration file.
<ios>
  <Webhook>
    <url type="text">http://kerberos.web/api/v1/webhook</url>
    <throttler type="number">0</throttler>
  </Webhook>
</ios>
Url
This is the URL, to which the machinery will send a JSON object (as a POST request).
Throttler
Control the number of executions by setting a throttling value. E.g. if you set throttling to 5, the Webhook will only be triggered once in 5 seconds, nevertheless more detections occurred.
Output
A JSON object is POSTed to the url you’ve defined.
[
  'regionCoordinates' : [618, 317, 703, 493],
  'numberOfChanges' : 5446,
  'timestamp' : '1465894497',
  'microseconds' : '5-97451',
  'token' : 695,
  'pathToImage' : '1465894497_5-97451_frontdoor_618-317-703-493_5446_695.jpg',
  'instanceName' : 'frontdoor',
]
Script
A bash script can be executed after a valid event was detected. A JSON object is send in the first parameter to the script you’ve defined.
Parameters
The parameters of the Script output device can be found in the config/io.xml file, but you can also use the web to modify the parameters. Below you see a default configuration file.
<ios>
  <Script>
    <path type="text">/etc/opt/kerberosio/scripts/run.sh</path>
    <throttler type="number">0</throttler>
  </Script>
</ios>
Path
The location of the script that will be executed on detection.
Throttler
Control the number of executions by setting a throttling value. E.g. if you set throttling to 5, the Script will only be triggered once in 5 seconds, nevertheless more detections occurred.
Example
By default the script will point to /etc/opt/kerberosio/scripts/run.sh, which contains a template how you should start your script. Note that when using KiOS, this script will be read-only, copy it to the /data folder and change the path parameter.
#!/bin/bash
# -------------------------------------------
# This is an example script which illustrates
# how to use the Script IO device.
#
# --------------------------------------
# The first parameter is the JSON object
#
# e.g. {"regionCoordinates":[308,250,346,329],"numberOfChanges":194,"timestamp":"1486049622","microseconds":"6-161868","token":344,"pathToImage":"1486049622_6-161868_frontdoor_308-250-346-329_194_344.jpg","instanceName":"frontdoor"}
JSON=$1
# -------------------------------------------
# You can use python to parse the JSON object
# and get the required fields
name=$(echo $JSON | python -c "import sys, json; print json.load(sys.stdin)['instanceName']")
coordinates=$(echo $JSON | python -c "import sys, json; print json.load(sys.stdin)['regionCoordinates']")
changes=$(echo $JSON | pythfon -c "import sys, json; print json.load(sys.stdin)['numberOfChanges']")
image=$(echo $JSON | python -c "import sys, json; print json.load(sys.stdin)['pathToImage']")
The idea is that you can use Python in your bash script, to parse the JSON object send as first parameter. Afterwards you can do with the output what you want.
MQTT
MQTT protocol is a light-weight Machine to Machine (M2M) protocol widely used in Internet of things. Detailed information (a JSON object) is published to an MQTT topic. The JSON object contains the number of changes, the region, the URL of the image, etc.
Parameters
The parameters of the MQTT output can be found in the config/io.xml file, but you can also use the web to modify the parameters. Below you see a default configuration file.
<ios
  <MQTT>
    <secure type="bool">false</secure>
    <verifycn type="bool">false</verifycn>
    <server type="number">127.0.0.1</server>
    <port type="number">1883</port>
    <topic type="text">kios/mqtt</topic>
    <username type="text"></username>
    <password type="text"></password>
    <throttler type="number">0</throttler>
  </MQTT>
</ios>
Secure
If checked, enable SSL/TLS support. Please note that when SSL/TLS support is enabled, the server certificate issuer is verified against the CA (Certification Authority) files available in /etc/ssl/certs.
Verifycn
If checked, the MQTT server FQDN or ip address must match the CN (Common Name) of the server certificate.
Server
IP address or FQDN of the MQTT broker.
Port
TCP port of the MQTT broker.
Topic
The topic to publish to.
Username
The username for authenticating to the MQTT broker. This is only supported by brokers that implement the MQTT spec v3.1. If username is not set (empty), the password argument is ignored. This is only needed if the MQTT broker is configured for authentication.
Password
The password to use, together with the username, for authenticating to the MQTT broker. This is only supported by brokers that implement the MQTT spec v3.1. This is only needed if the MQTT broker is configured for authentication.
Throttler
Control the number of executions by setting a throttling value. E.g. if you set throttling to 5, the MQTT will only be triggered once in 5 seconds, nevertheless more detections occurred.
Output
A JSON object is published to the topic of the MQTT broker you have configured.
[
  'regionCoordinates' : [618, 317, 703, 493],
  'numberOfChanges' : 5446,
  'timestamp' : '1465894497',
  'microseconds' : '5-97451',
  'token' : 695,
  'pathToImage' : '1465894497_5-97451_frontdoor_618-317-703-493_5446_695.jpg',
  'instanceName' : 'frontdoor',
]
Example
It is possible to subscribe multiple distributed IoT devices to the same MQTT topic and perform specific actions upon the detection of a motion. Devices with more resources could fetch the image to perform further elaboration.
Streaming
The machinery has the ability to stream your capture device as a MJPG stream.
Parameters
The parameters for the supported streaming protocols can be found in the config/stream.xml file, but you can also use the web to modify the parameters. Below you see a default configuration file; at the moment of writing only a MJPG stream is supported.
<streams>
	<Mjpg>
    	<enabled type="bool">true</enabled>
    	<streamPort type="number">8889</streamPort>
    	<quality type="number">75</quality>
    	<username type="number"></username>
    	<password type="number">75</password>
    </Mjpg>
</streams>
Enabled
A boolean which turns ON/OFF the stream. This is interesting when working with IP cameras, where you already have an RTSP/MJPG stream from the camera itself.
Stream Port
The port on which the stream is available.
Quality
The quality is a value between [0-100]. The lower the quality, the more the image will be compressed. If you’re using the RaspberryPi Camera module, this option will be ignored.
Username/password
You can secure the MJPEG streaming with a username and password. These credentials will be used to authorize your requests using Basic Authentication. Please note that once enabled, the live stream on the dashboard page can fail; however it will work if you open it directly in your browser or ip camera client. The format of the streaming url, after authentication enabled, will look as following:
http://username:password@ip-camera:8899